In this AWS Snowball And Snowmobile Tutorial will introduce you to how data migration works on Amazon Web Services Cloud. Following pointers will be covered in this article,
- Use Case For Data Migration
- AWS Snowball
- Steps For Migrating Data To The AWS Cloud Using Snowball
- Snowball vs Snowmobile
So let us get started then,
Use Case For Data Migration
With the faster penetration of higher internet speeds, satellites and smart phones the amount of data generated is increasing day by day. For ex., a Satellite Imagery Company might be already storing Petabytes of information of the earth and updating the same on a regular basis. Adding storage capacity on a constant basis would be a huge challenge to them not only in terms of the cost, but also in terms of logistics like space, power supply, security etc. This is where the Cloud Providers like AWS will come into picture. A few other use cases where companies have huge amounts of data is for storing the video libraries, genomic sequences, seismic data.
Get an in-depth understanding of Data Migration from the AWS Training and Certification.
The Satellite Imagery Company and others would like to move their applications and data to the Cloud and let the Cloud Provider take care of the storage aspect like security, backup, additional storage etc. This way the Satellite Imagery Company might focus on its core business to find more customers, providing more value to the customers, more ways for the customers to interact with them etc.
But, moving Petabytes of data over the internet has its own challenges. According to the AWS documentation here: 100 terabytes of data will take more than 100 days to transfer over a dedicated 100 Mbps connection. Forget about moving Petabytes of data, it will take close to a year. On top of the time required there is an additional cost of network bandwidth and let’s not forget the data snooping when a public internet is used. This is where services like AWS Snowball and AWS Snowmobile come into the picture.
Next in this AWS Snowball and Snowmobile Tutorial
AWS Snowball
The Snowball is a rugged device and is also explosive proof, a tad bigger than the size of a suitcase and can be checked into a flight also. Here are a few links (1, 2) on how rugged a Snowball is.

Another option to speed up the data movement between the Data Center and the AWS Cloud is to use the AWS Direct Connect Service. Using this service, a dedicated line is established between the AWS Cloud and your own Data Center for a stable connection and consistent high bandwidth.
Next in this AWS Snowball and Snowmobile Tutorial let us see how data migration works,
Steps For Migrating Data To The AWS Cloud Using Snowball
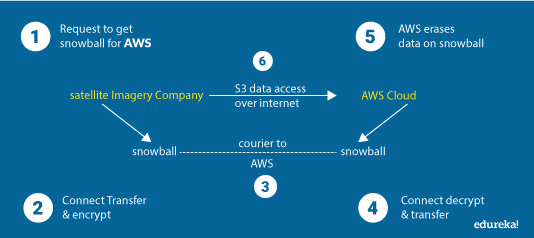
 Here are the steps at a high level to migrate the data between your own Data Center and the AWS Cloud.
Step 1: Request one or more Snowball devices from AWS depending upon the amount of data to be transferred. A Snowball has two versions with 50 and 80 TB storages and can be ordered from AWS via the management console.
Step 2: AWS would be shipping the Snowball to the customer. The next step would be to connect the same to the local network and then transfer the data into the Snowball using the Client program provided by AWS. The data gets automatically gets encrypted and stored.
Step 3: Once the data has been transferred to the Snowball, it must be couriered to AWS. The Snowball has e-ink to automatically populate the address of the AWS location. The data in the Snowball is encrypted (256-bit encryptions using AWS KMS Keys), so it’s now possible that the Snowball gets tampered or someone tries to get the data out of it. It’s all protected.
Step 4: Once the AWS folks get the Snowball, they connect it to the AWS Cloud, decrypt the data and move the data to S3.
Step 5: Once the data has been moved to S3, the Snowball is wiped out for no one to access it further.
Step 6: The last and the final step is for the customer to access the data in S3. From there the data can be moved to EBS, EFS, DynamoDB and various other AWS Services.
The above-mentioned steps are very much like how we transfer the data from one Laptop to another when not connected in a network. We insert the USB Drive to the source Laptop, copy the data to the USB Drive. Remove and insert the USB Drive to the target Laptop and copy the data. While the above-mentioned steps are for moving the data from our own Data Center to the AWS Cloud, it’s also possible to move the data the other way, by following the exact steps in the reverse order. This way there is no locking of the data.
Not only the Snowball is used to move the data of the existing applications to the AWS Cloud, but can also be used to for the Data Center Migration when it makes sense to close an existing Data Center and move everything to the Cloud. This approach makes the transition faster when compared to moving the data over the public internet which is a bit slow. The best way to become a Migrating to AWS is by getting the AWS Cloud Migration Certification.
This brings us to the final bit of AWS Snowball and Snowmobile Tutorial,
Snowball vs Snowmobile
A single Snowball can store up to 80 TB of data out of which only 72 TB is of usable space. Multiple Snowball’s can be used in parallel when there is a requirement to move more than 80 TB of data.

AWS also provides a Snowmobile where the size of the data stored is much more than what a Snowball can store. A Snowball is a rugged shipping container with a semi-trailer truck. While a single Snowball can store up to 80 TB of data, a single Snowmobile can store 100 PB of data, which is almost 1,250 times the capacity of a single Snowball. AWS recommends using a Snowball when the data to be transferred is less than 10 PB or else to use a Snowmobile. Apart from the default encryption Snowmobile takes a few additional steps like GPS tracking, 24/7 Video Surveillance, optional escort to make the data even more secure.

 Here are the steps at a high level to migrate the data between your own Data Center and the AWS Cloud.


